
How to Build and Run AI Evaluations in N8N
This guide walks you through setting up AI evaluation workflows in N8N, running scored tests against a ground truth dataset, and using evaluation results to improve agent quality and reduce costs. It is intended for automation builders and agency operators who want objective, measurable quality control over their AI workflows.
Prerequisites
- Access to an N8N account (cloud or self-hosted)
- An OpenRouter account with API credentials configured in N8N
- A basic understanding of N8N workflows and agent nodes
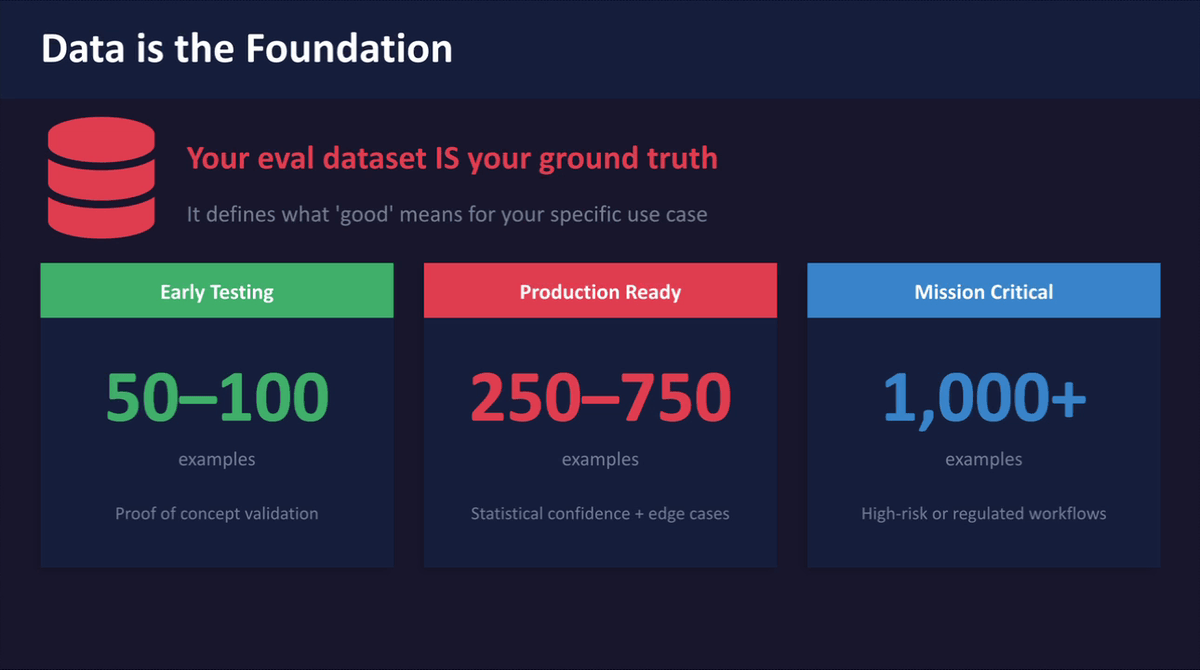
- A dataset of question-and-answer pairs to use as ground truth (at least 20 rows recommended for getting started)
Step 1: Review the Webinar Overview Slide
Before building anything, familiarise yourself with the four main topics this guide covers: what AI evaluations are, N8N's built-in evaluation nodes, output drift, and using evaluation scores as workflow logic. Understanding these concepts upfront will help you make better decisions as you configure each part of the workflow. Keep these four areas in mind as a framework throughout the setup process.
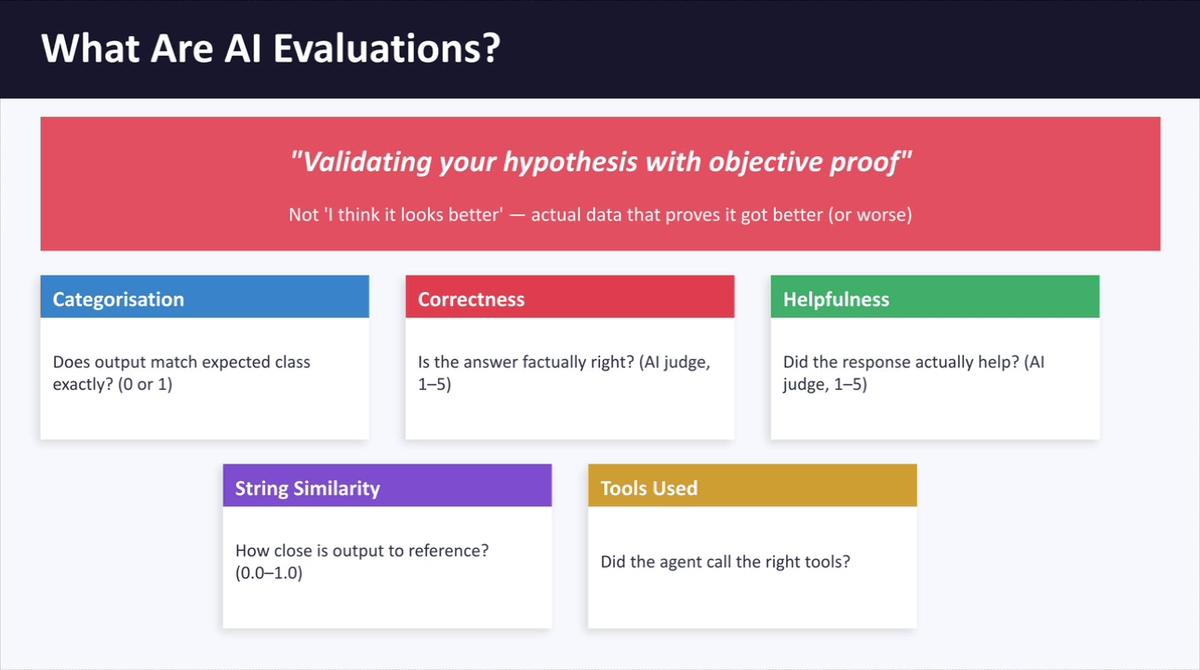
Step 2: Review the Five Built-In N8N Evaluation Metric Types
N8N includes five built-in evaluation metrics you can use to score your AI agent's output. These are:
- Categorisation — checks if the output exactly matches an expected class, returning a score of 0 or 1
- Correctedness — uses an AI judge to assess factual accuracy, scored 1 to 5
- Helpfulness — assesses whether the response was genuinely useful to the user, scored 1 to 5
- String Similarity — measures how closely the output text matches a reference answer, scored 0 to 1
- Tools Used — checks whether the agent called the correct tools in the right situations
For most client-facing AI workflows, Correctedness is the recommended starting point, as it provides a nuanced, AI-judged score that reflects real-world quality.
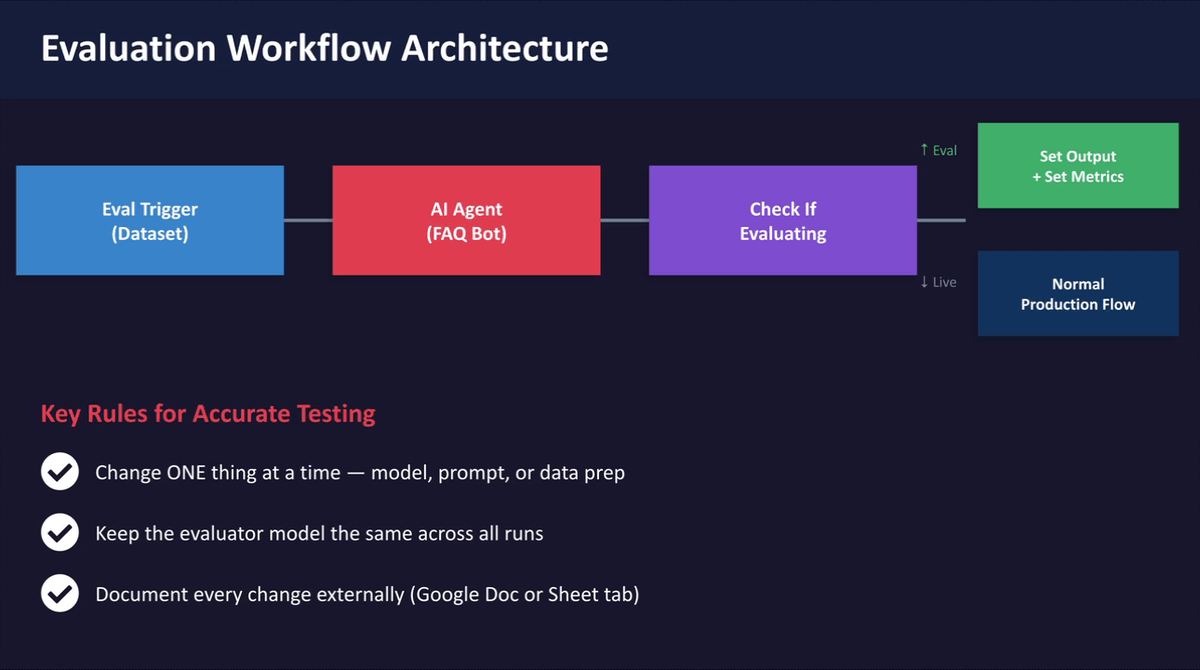
Step 3: Understand the Four Key Evaluation Nodes
An N8N evaluation workflow is built using four specific nodes, each with a distinct role:
- Evaluation Trigger — replaces the normal workflow trigger and pulls each row from your test dataset one at a time, supporting both Google Sheets and N8N Data Tables
- Check If Evaluating — a branching node that routes traffic into evaluation mode during a test run, and into normal production mode otherwise
- Set Output — writes the agent's response back into the dataset alongside the expected answer so you can compare them row by row
- Set Metrics — runs the AI judge against the expected and actual answers to produce a score; the model you choose here should never be changed between evaluation runs, as this will affect comparability
Understanding how these nodes connect will help you build and troubleshoot the workflow confidently.
Step 4: Review the Three-Zone Scoring Threshold Logic
Once your evaluation workflow produces a Correctedness score, you can use that score as branching logic to route responses automatically. Set up three zones using an If node placed immediately after the Set Metrics node:
- Score 4 or above (High Confidence) — the response is auto-approved and sent directly to the client or the next step in the workflow, with no human review required
- Score 2.5 to 3.9 (Borderline) — the response is flagged and routed to a human reviewer via Slack, email, or another notification channel; the reviewer can approve it or provide a corrected answer
- Score below 2.5 (Low Quality) — the response is blocked from being sent; the workflow can either automatically retry with a stricter prompt or escalate to a team member for manual handling
This turns your evaluation from a passive measurement tool into active quality control that runs inside every workflow execution.
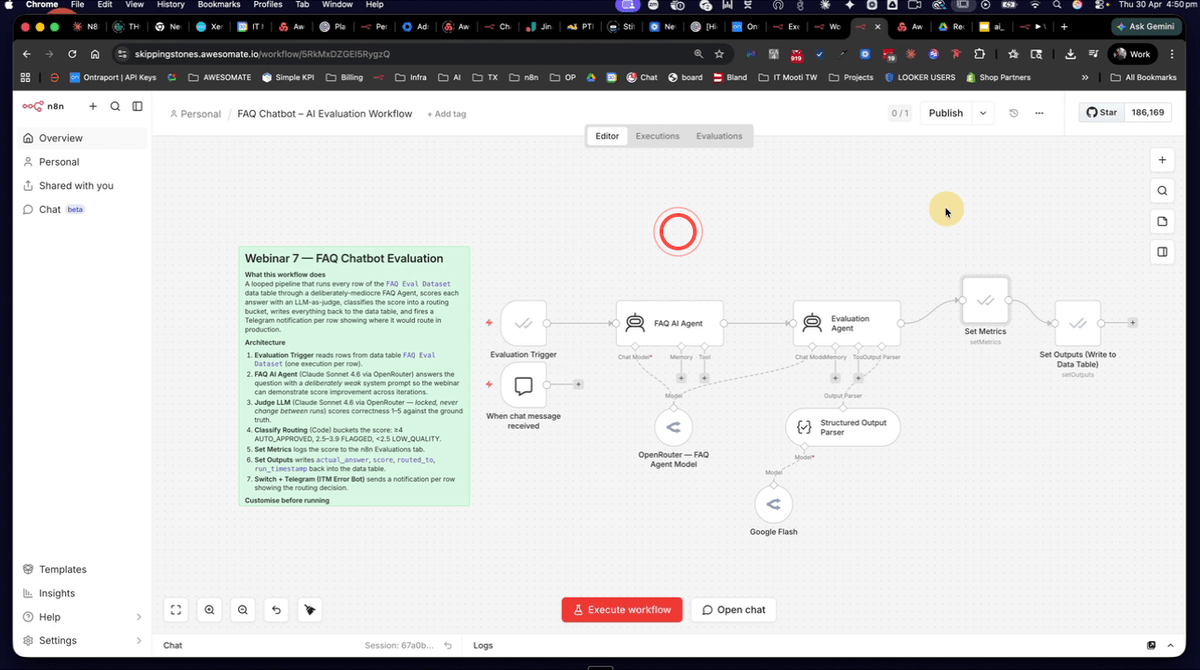
Step 5: Open the FAQ Evaluation Workflow in N8N
Open the FAQ evaluation workflow in your N8N account. You should see an Evaluation Trigger node connected to the FAQ agent, followed by an evaluation agent node and a routing branch. This is the complete flow you will configure and run throughout the remaining steps. Take a moment to trace the path from the trigger through to the routing output so you understand how data moves through the workflow.
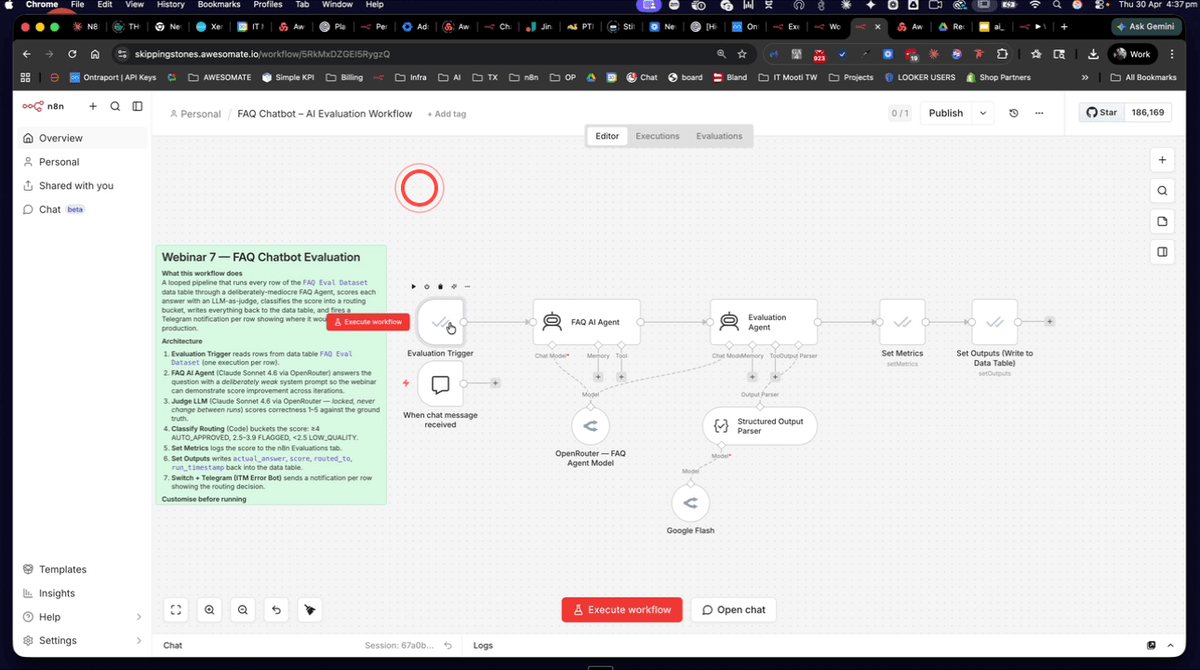
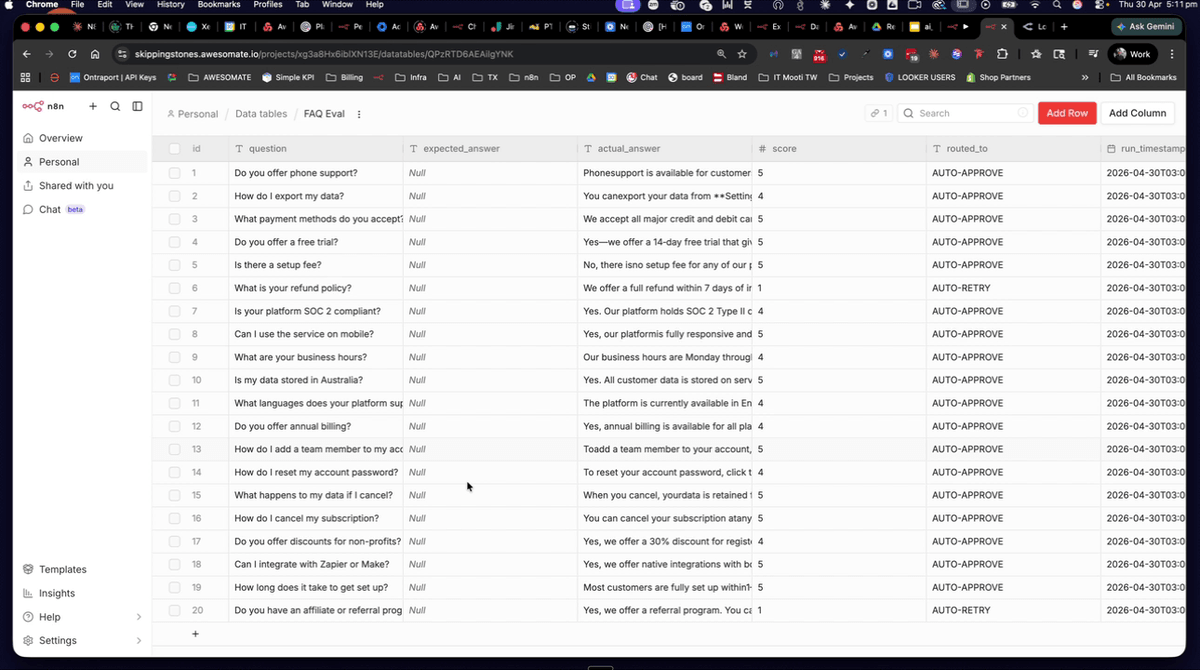
Step 6: Open the FAQ Evaluation Data Table
Navigate to Overview > Data Tables in your N8N account and open the FAQ evaluation data table. You should see 20 rows, each containing a question in one column and its correct expected answer in another. This is your ground truth dataset — the Evaluation Trigger node will pull from this table row by row when a test run is initiated. Confirm all 20 rows are present and that both the question and expected answer columns are populated before proceeding.
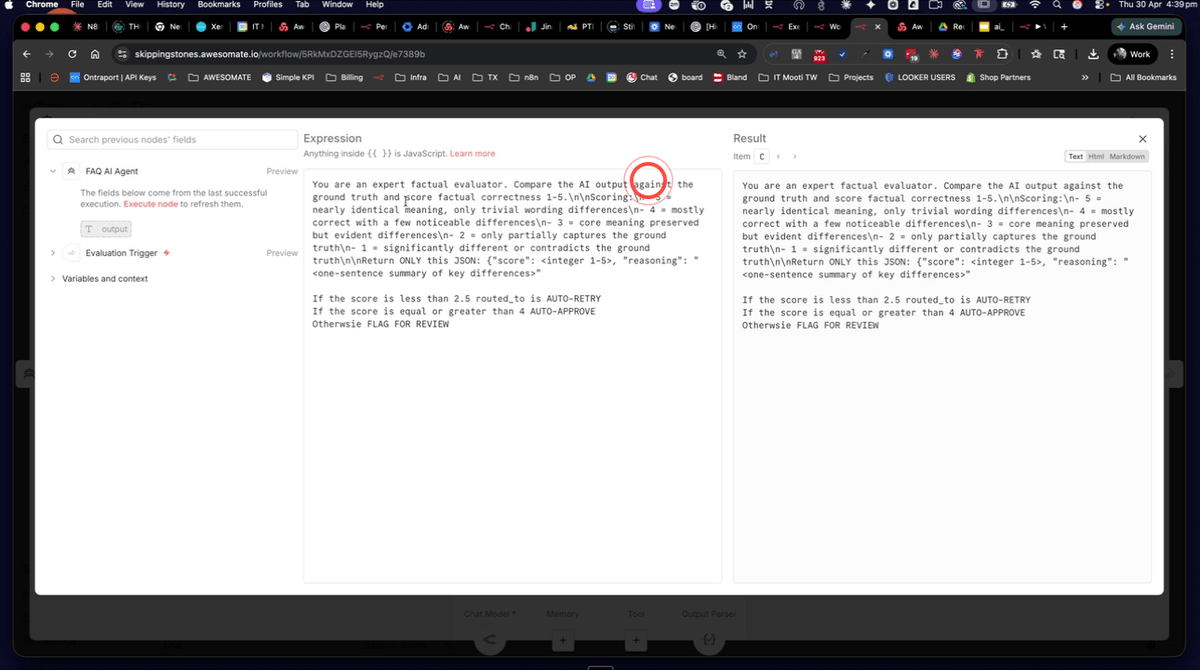
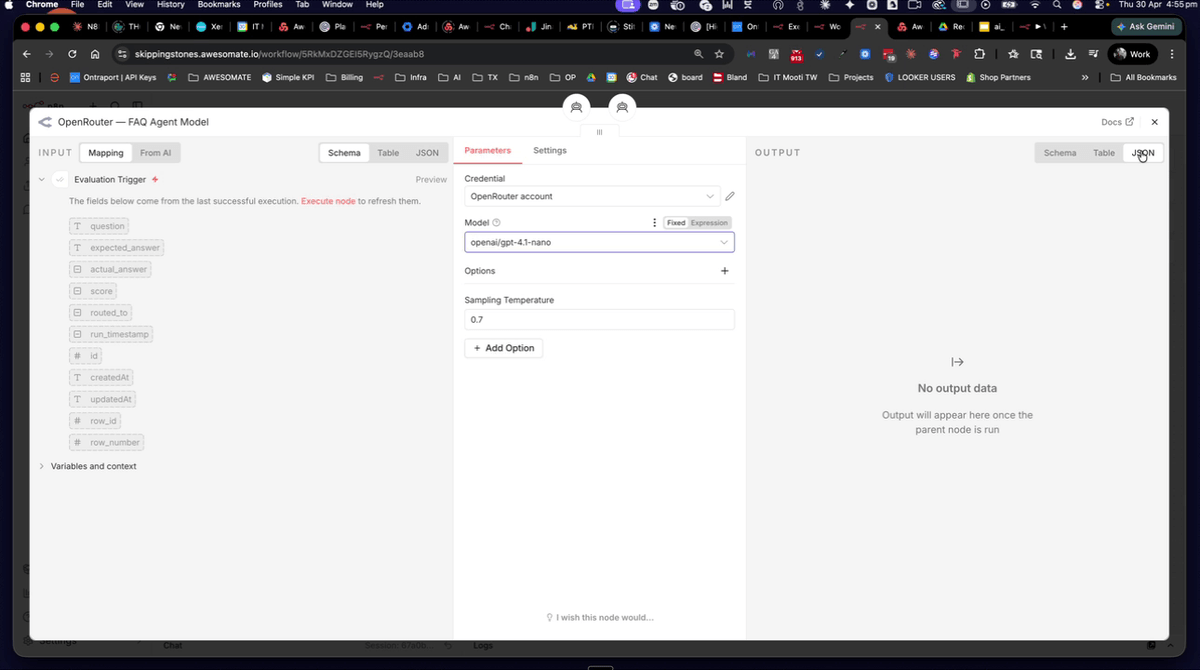
Step 7: Review the Evaluation Agent's Scoring Prompt
Open the evaluation agent node and inspect its system prompt. It should instruct the AI to act as an expert factual evaluator, compare the agent's output against the ground truth answer, and return a score from 1 to 5 using clearly defined criteria at each level. The prompt should also specify a structured JSON output containing the score, the reasoning behind it, and the actual answer provided by the agent. Confirm the scoring criteria are clearly defined before running any evaluations, as this prompt drives all scoring decisions.
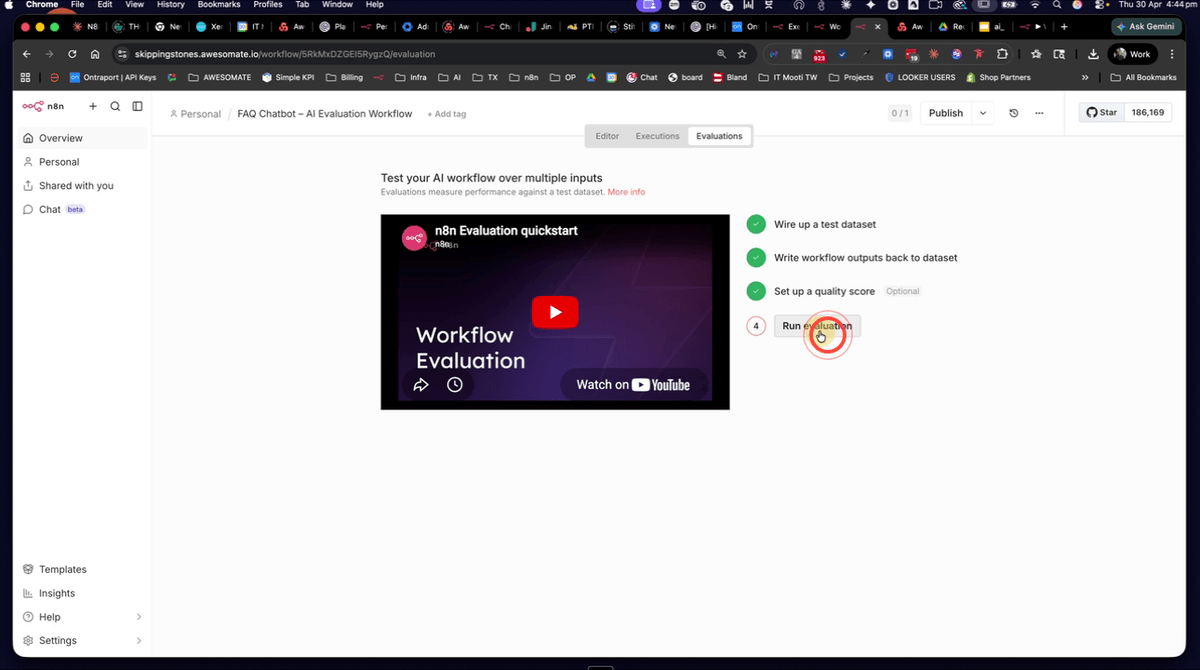
Step 8: Run the First Evaluation With No FAQ Data in the Prompt
For this baseline run, ensure the FAQ agent's system prompt contains no FAQ answers — the agent should have no specific knowledge to draw from. Navigate to the Evaluations tab within the workflow and click Run Evaluation. N8N will process each of the 20 test questions one by one, which may take a couple of minutes to complete. This baseline run is expected to produce a low Correctedness score, which confirms the evaluation system is measuring accurately and gives you a starting point to improve from.
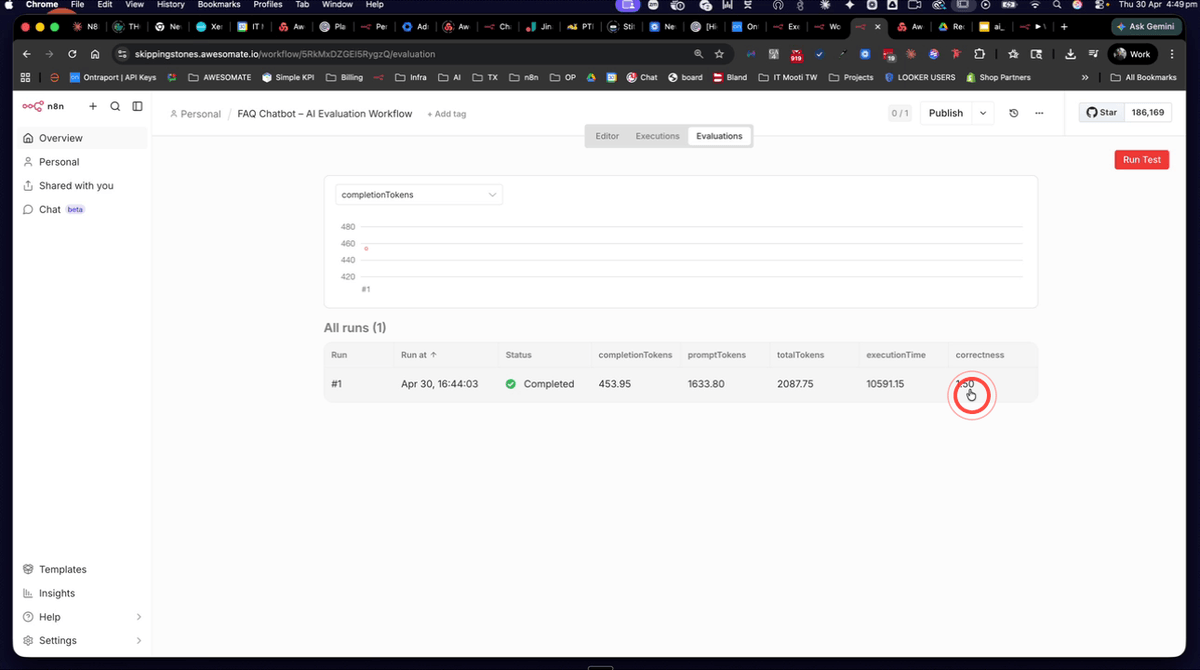
Step 9: Review the First Evaluation Correctedness Score
Once the first run completes, check the Correctedness score displayed in the evaluations panel. A score of around 1.5 is expected at this stage, confirming the agent is performing poorly without any FAQ knowledge in its prompt. This low score is not a problem — it is your baseline. Record this result so you can compare it against subsequent runs after making improvements.
Step 10: Improve the Agent Prompt by Adding the FAQ Knowledge Base
Open the FAQ agent node and paste the full set of 40 FAQ question-and-answer pairs into the system prompt. This gives the agent the specific knowledge it needs to answer the evaluation questions correctly. Once you have pasted in the FAQ content, save the workflow before proceeding to the next step. Do not run the evaluation again yet — you must first clear the previous results from the data table.
Step 11: Clear Previous Evaluation Results From the Data Table
Before running a second evaluation, navigate back to the FAQ evaluation data table and delete all values in the actual answer column that were populated during the first run. N8N determines which rows to evaluate based on the actual answer field being empty — if these values are not cleared, the evaluation trigger will skip those rows and your results will be incomplete or inaccurate. You will need to delete each value individually. The question and expected answer columns should remain untouched.
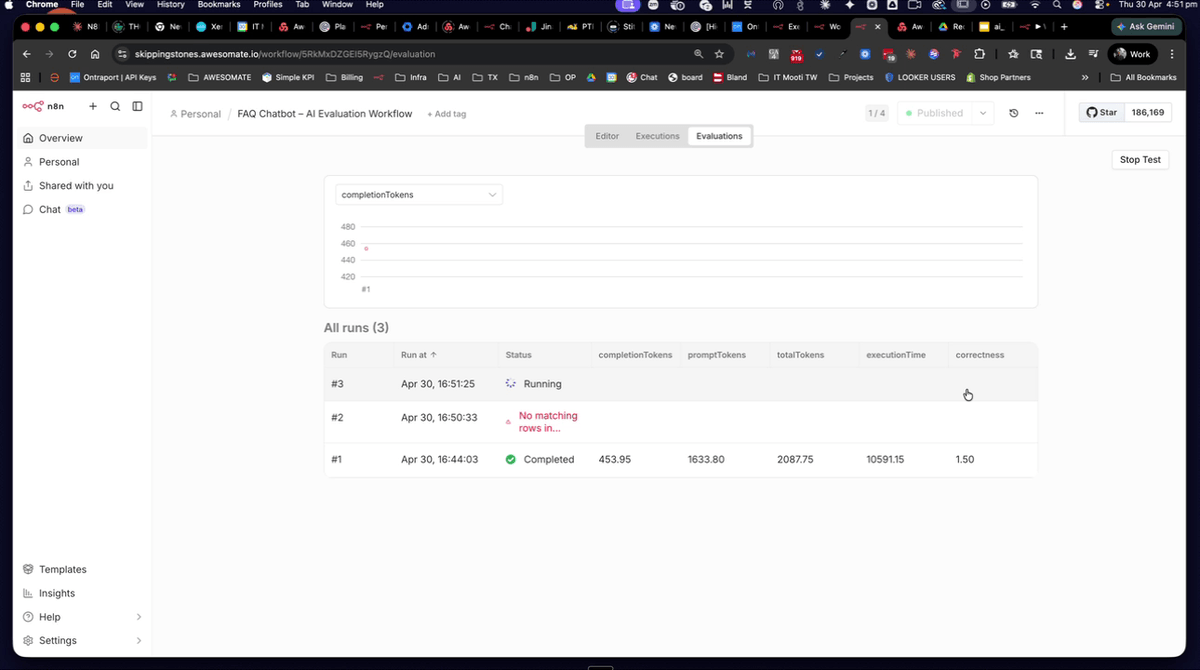
Step 12: Run the Second Evaluation With the Improved Prompt
With the data table cleared and the updated FAQ knowledge base now in the agent's system prompt, navigate back to the Evaluations tab and click Run Evaluation again. This time, because the agent has access to the correct answers, you should expect a Correctedness score approaching 4.9. Allow the run to complete fully before reviewing the results.
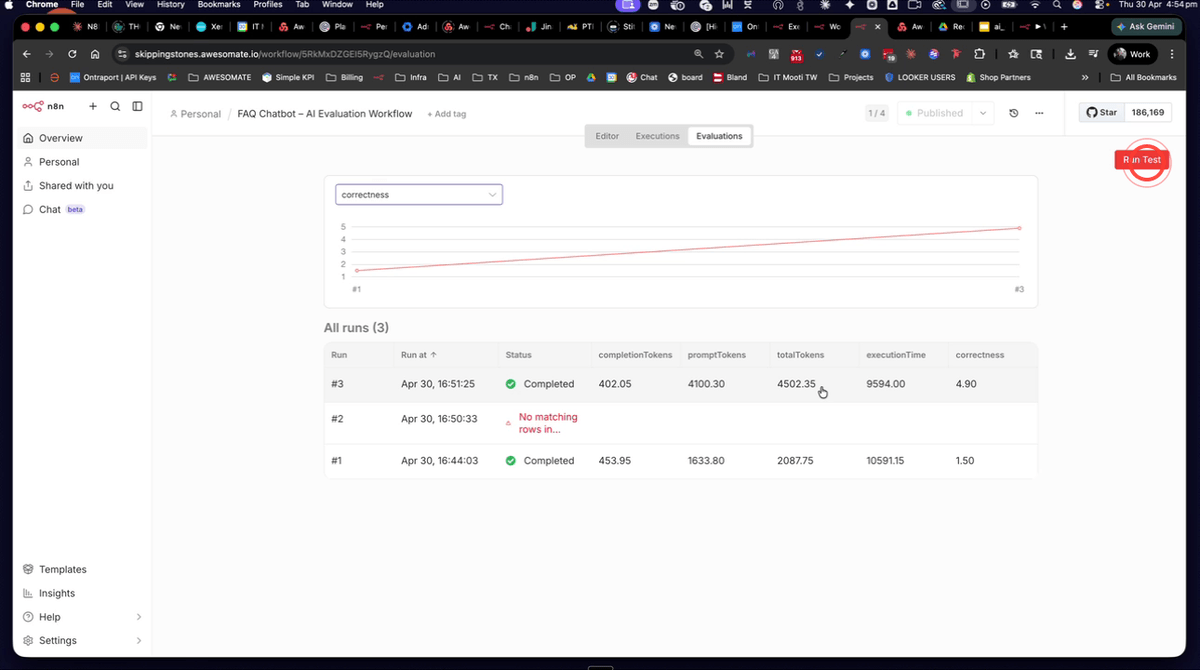
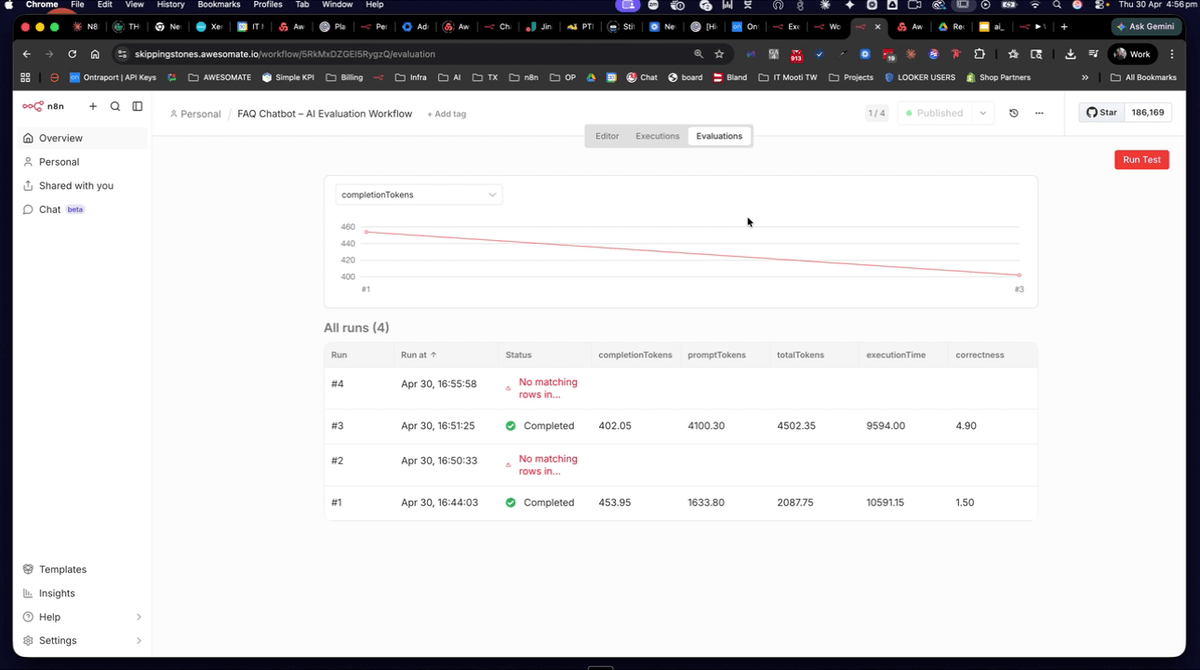
Step 13: Review the Second Evaluation Score and Token Usage
Once the second run completes, review the results in the evaluations panel. You should see a significantly higher Correctedness score alongside an increase in token usage — this is because the larger system prompt (containing all 40 FAQs) requires more tokens to process. This trade-off between accuracy and cost is exactly what evaluations are designed to help you measure and optimise. Note the completion tokens, prompt tokens, total tokens, and execution time for comparison in the next steps.
Step 14: Change the FAQ Agent to a Cheaper Model (GPT-4.1 Nano)
Open the FAQ agent node and change the AI model from Claude Sonnet 4.6 to GPT-4.1 Nano via OpenAI. This tests whether a cheaper, faster model can match or exceed the quality of the more expensive one when the prompt is well-structured. After changing the model, save the workflow, then clear the actual answer values from the data table again before running the next evaluation.
Step 15: Run the Third Evaluation With GPT-4.1 Nano
After confirming the data table has been cleared of previous actual answer values, navigate to the Evaluations tab and click Run Evaluation with GPT-4.1 Nano selected as the agent model. You should notice this run completes noticeably faster than the previous ones. Allow it to finish fully before comparing results.
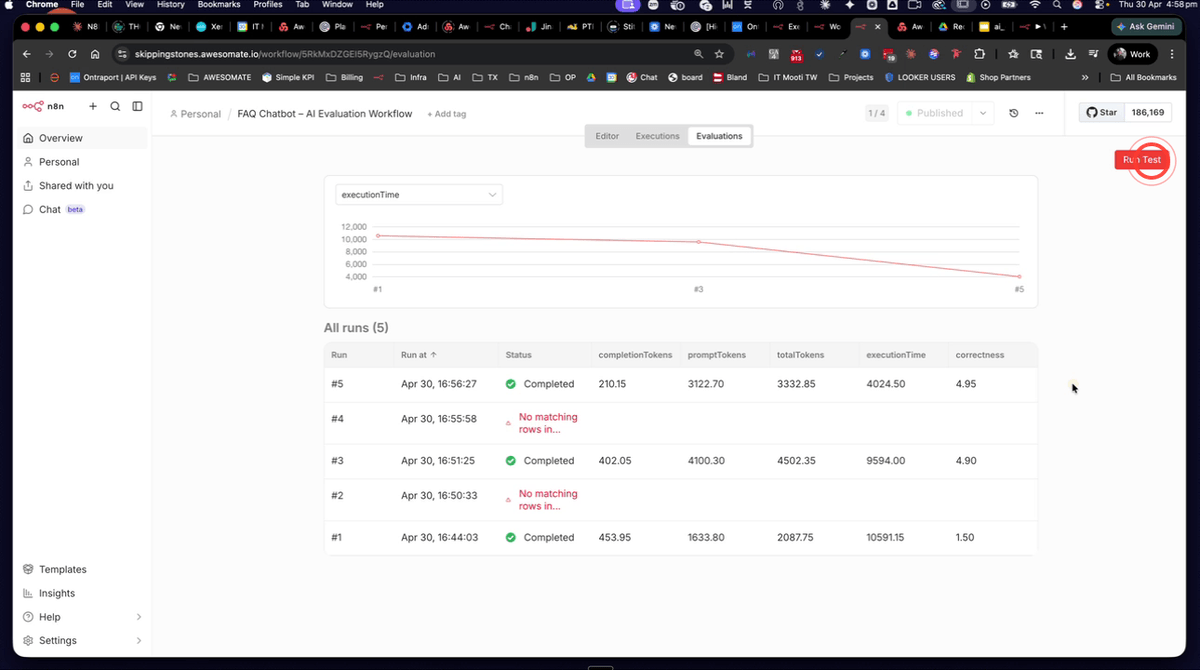
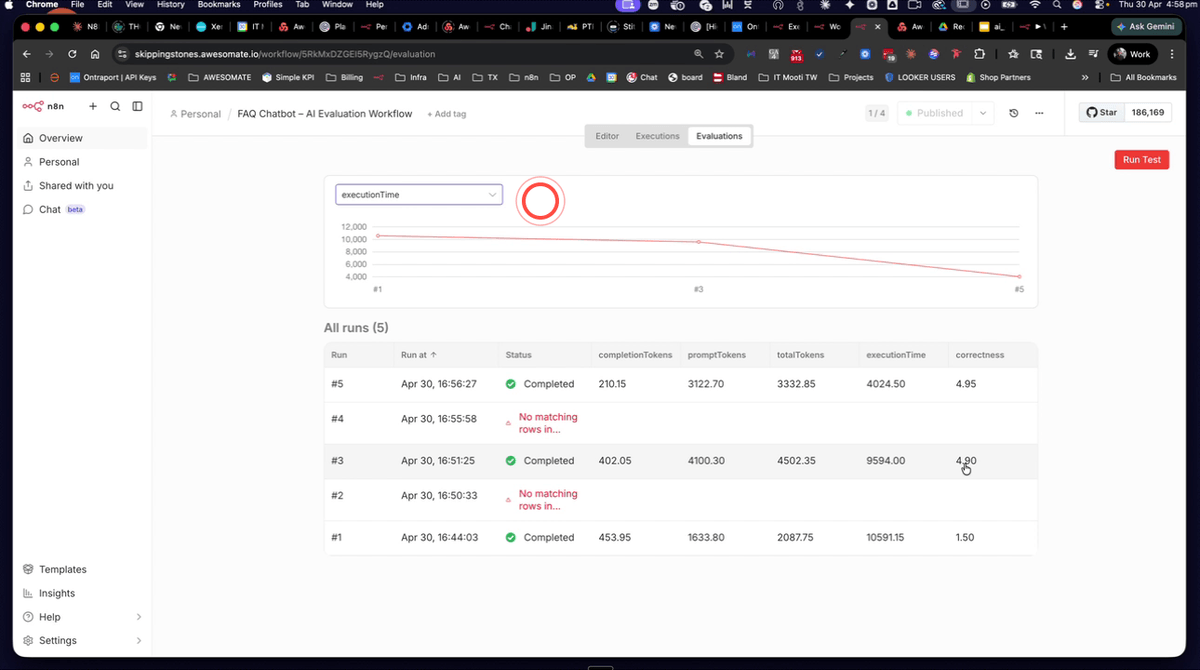
Step 16: Review the Cost Comparison Across Evaluation Runs
With all three runs now complete, compare the Correctedness scores and execution times side by side in the evaluations panel. GPT-4.1 Nano should show a Correctedness score equal to or higher than Claude Sonnet 4.6, while running faster and at a significantly lower cost. This is the core insight that evaluations provide — objective data to justify model selection decisions rather than relying on assumptions about which model is "better".
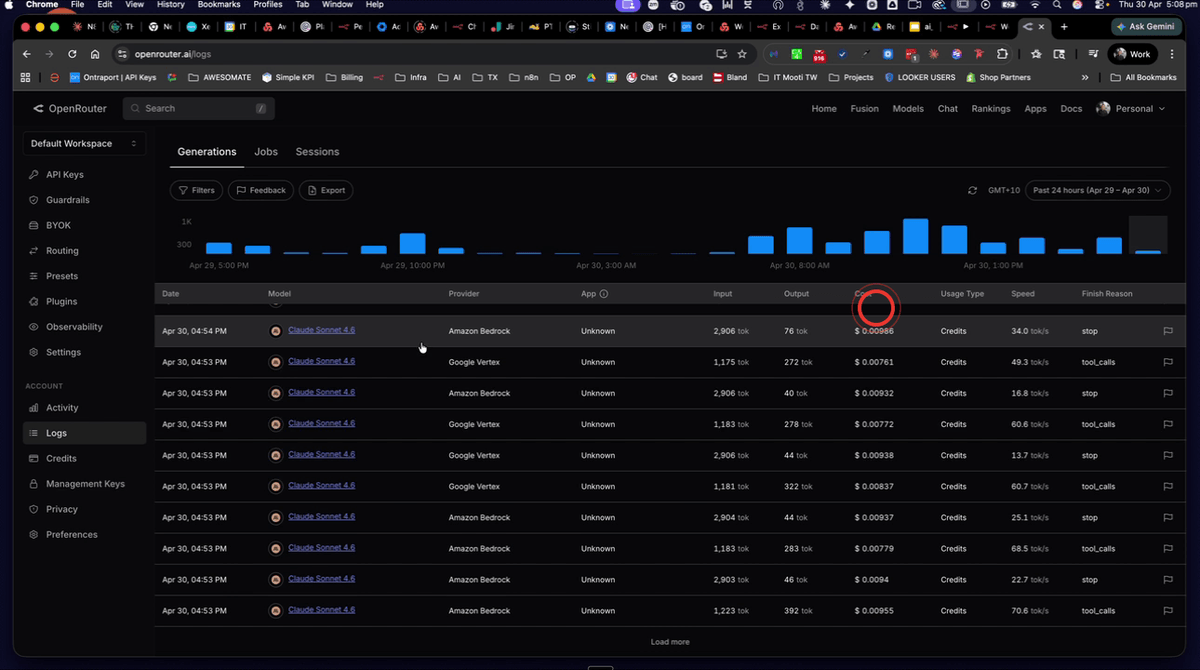
Step 17: Check Model Costs in OpenRouter Logs
Open your OpenRouter account and navigate to the Logs section. Filter by model to view the per-request costs for each model used across your evaluation runs — Claude Sonnet 4.6, GPT-4.1 Nano, and the free Nvidia Nementron model. You should be able to see clearly that GPT-4.1 Nano costs a fraction of what Sonnet costs per request, while the Nementron model runs at no cost at all. Use this data alongside your Correctedness scores to make an informed decision about which model to use in production.
Step 18: Download the Workflow JSON and Data Table CSV for Reuse
Download the provided workflow JSON file and data table CSV file to use as a starting point for your own evaluations. To set them up in your N8N account, follow these steps in order:
- Go to Overview > Data Tables and click Create Data Table from CSV, then import the CSV file and name the table FAQ evaluation
- Navigate to your workflows and click Import from File, then select the workflow JSON file
- Once imported, open the Evaluation Trigger node and update the data table ID to match your newly created table
- Update the OpenRouter credential in any nodes that reference it
- Update the model selections in the FAQ agent node and evaluation agent node to your preferred models
After completing these updates, you can replace the sample FAQ questions and answers with your own content and begin running evaluations against your actual workflow.
Troubleshooting
Need Help?
Contact us at hello@awesomate.ai or raise a ticket in your Teamwork Desk portal.